A solid DAM system can solve many problems. It can make finding digital assets easy, for example. With DAM, you no longer have to spend hours trying to locate the correct or most up-to-date versions of files. DAM also gives you full control over who accesses those files and when, and more. But even the most advanced digital asset management system won’t be able to do much unless you first organize digital assets logically. That’s where metadata mapping comes in.
Table of Contents
When you search for assets in DAM, you basically scout metadata. The problem? Well, most metadata isn’t universal, for one. Different systems and platforms will use different fields to denote similar information.
So, unless you map it all together, you create chaos that will prevent you from using the DAM to its fullest potential.
In this guide, we’ll explain the concept of metadata mapping, and show you how to map metadata correctly.
It’s a lot to cover so, let’s do it.

FREE DAM GUIDE
What Do We Mean by Mapping Metadata?
In DAM, the term metadata describes all information that you’ve specified about a file, including its copyright.
In practical terms, metadata works similarly to a database table, and uses itemized fields to store a specific piece of information that describes a particular aspect of the asset.
Take information about this image, for example.
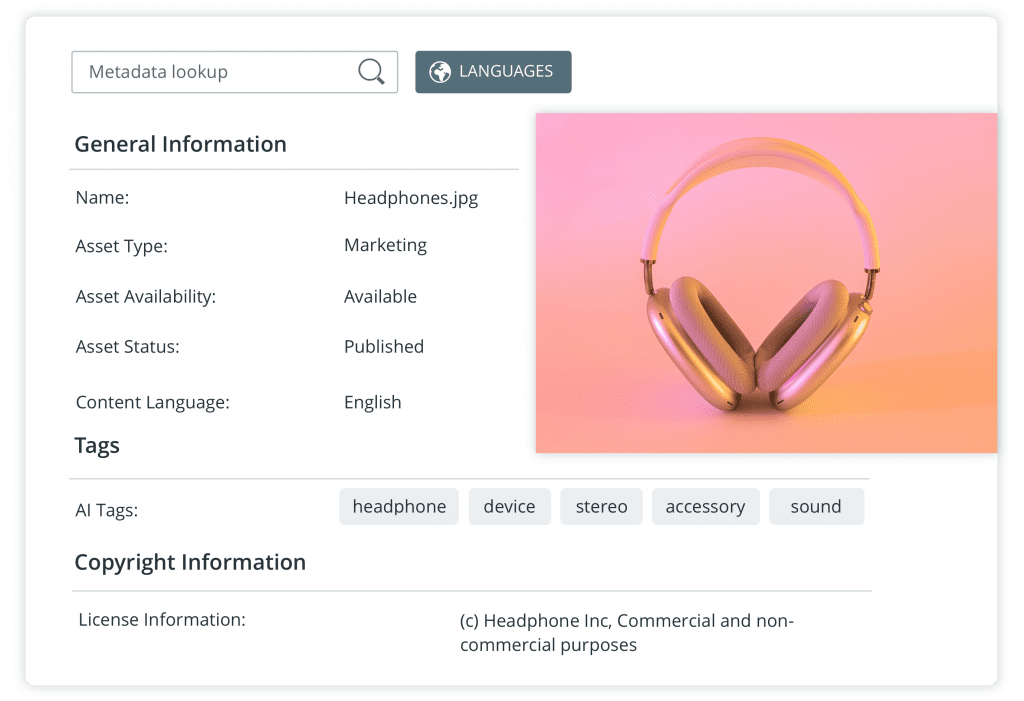
You can see quite a lot of metadata information attached to the file:
- It’s name,
- Asset type,
- Asset availability,
- Asset usage,
- Status,
- Language,
- Tags associated with it, and even,
- License information.
Naturally, this is only a small snapshot of all possible metadata fields that you could create. But even this limited data set would already make the image much easier to find.
Not only could you search for it by name but also specify what type of asset you’re looking for, and describe it further with tags.

But this is also where the problem starts. Actually, there are several challenges here.
First one is that specifying metadata information for each file manually would be a slow and tedious process. It’s possible, of course, and it’s something you do when you upload just a single file. But it’s almost impossible to do when you batch upload hundreds of images from a photo shoot, for example.
Going through each of those files one by one would take far too much time and effort.
The other problem is that various systems would use their own labels for metadata. So, what one system might call “Asset Type” another would label as “Asset’s Purpose.” Again, this isn’t a major problem when you’re uploading only a handful of files at the same time. But it becomes a challenge when you do so with hundreds, if not more, assets.
Metadata mapping is a process that allows you to automatically assign information from one source to another, and ensure that all equivalent metadata fields are mapped out correctly.
Let me show you an example of how it works.
Let’s say that your design department receives a project to produce a product sheet. The first thing they need to do, obviously, is collect all the project’s assets. This includes the approved copy, the brief and project overview, associated images, and so on.
The design team uses InDesign. But obviously that’s not where their assets are. Other departments responsible for them have uploaded those files to the DAM system and archived them according to the company’s DAM processes. But because they also specified all metadata relating to those files, and that information is mapped correctly (such as product ID, description or copyright availability), the design team doesn’t actually have to go to the DAM to retrieve them. They use the tool’s integration with InDesign, and immediately access relevant files.
This happens because all equivalent metadata fields are mapped correctly across those systems.
But Why Bother? Why Is Having Metadata Mapped Correctly So Critical?
To explain this, let me illustrate what happens when the opposite is true – When you’ve just uploaded all your assets, without ensuring that metadata is matched across systems.
- Firstly, you’re going to have a pretty hard time finding assets. Just think about it, without the correct mapping, you’re, most likely, going to miss out a lot of assets in your search simply because their metadata fields don’t match what you’re searching for.
- It’s going to be hard to integrate your DAM with other tools, like content creation platforms, web publishing tools, etc. Again, these platforms will struggle to forward the correct information from one system to another, simply because metadata doesn’t match.
- You risk information loss. Many assets will have metadata already assigned to them. Take photos and EXIF/IPTC/XMP information. Without correct metadata mapping, you risk losing that information during file upload.
But luckily, the opposite is true when you create a metadata mapping system in your DAM. You’ll save a lot of time trying to find assets. Your DAM will integrate with other tools well. And you’re going to retain all the necessary information about each file.
Let’s see how to do it, in practice.
How to Map Metadata Correctly in a DAM System
In practical terms, metadata mapping revolves around assigning (or mapping) tags to various metadata fields to create a cohesive system for storing and retrieving assets
Let’s go back to the example of metadata attached to an image.
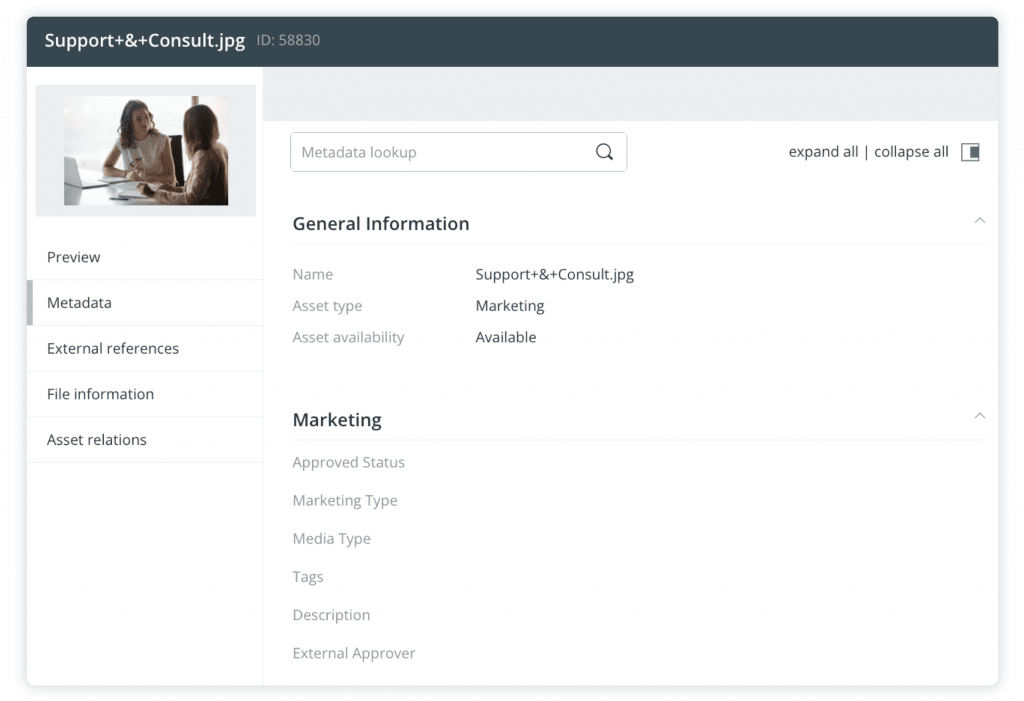
Each of these metadata fields needs to be specified for the image. The same process applies to other assets you’d be uploading to the DAM.
So, to do that correctly, you need to create a metadata structure or DAM taxonomy. Then, you need to follow that structure as you upload each file or files in bulk.
Luckily, it’s very easy to do.
Understand what the metadata you have already across all systems
The first step is to take a complete stock of all the metadata you have across all systems.
Keep in mind that this task involves more than just listing the metadata you use in the DAM.
Many assets will also have their own metadata attached to them – stock photography, for instance. Your product information management (PIM) system will assign metadata as well, so will your content system, and so on.
So, review all sources and the metadata they assign. This way, you’ll have a clear picture of what metadata already exists and what you need to map in your DAM.
Review what metadata import options you have available
Typically, there are three types of imports:
- One-time metadata uploads that allow you to map metadata from different files. In this case, you specify metadata mapping before the import with an XLS or CSV file that includes all metadata. During the import, that file is used to populate the metadata in the DAM system.
- Metadata mapping based on naming conventions. In this case, you specify a framework that uses file names to map metadata to assets.
- Automatic imports of the common formats. This option is ideal if you receive a lot of assets from digital photographers. Their equipment and platforms automatically assign metadata information – XMP, EXIF, RAW, or IPTC. Your DAM platform can automatically upload and map this information correctly.
Read our free guide to learn how a Digital Asset Management (DAM) system optimizes the content supply chain to reduce complexity, cost and time to market.